 In general, taxonomies are used to arrange, classify and group things. By default, Taxonomies in WordPress are tags and categories that WordPress is using for the posts. Apart from these two, WordPress makes it possible for theme developers to create their own taxonomies which are created within the functions.php theme file. This is what we are going to cover today. We will learn how to work with Custom WordPress taxonomies.
Recently, I’ve started working on my portfolio WordPress theme, and I needed to define different information for each project/template, like price, colors, style, etc. For this thing, I needed to create three more taxonomies which are looking like this:
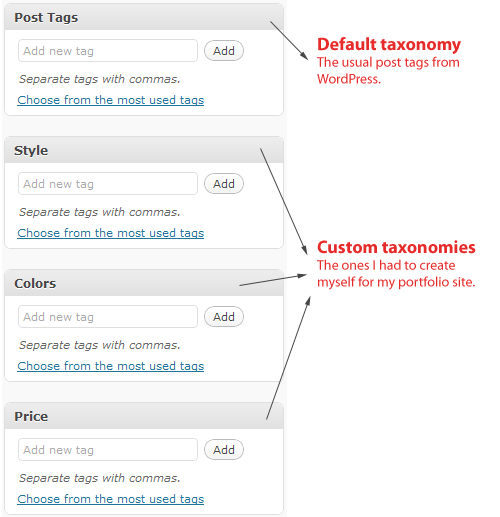
Creating a new taxonomy
This is as simple as it is to look at the picture above. All you have to do is to copy the code below, in your functions.php. If your theme doesn’t have one, which I don’t think it hasn’t already one, just create the file yourself. Now, this is the code you have to write for each taxonomy you are creating:<?php
register_taxonomy('test', 'post', array(
'hierarchical' => false, 'label' => 'test',
'query_var' => true, 'rewrite' => true));
?>
Just replace “test” with the name of the taxonomy you wish to create. That’s how you create custom taxonomies. The’ll just appear in the Dashboard below the Post Tags.Using the new taxonomies
We have created them, but as well as tags and categories, you need some code if you want to output them in your article. That’s a little code snippet that goes into your WordPress loop, just like the post tags and categories:<?php echo get_the_term_list($post->ID, 'people', 'People: ', ', ', ''); ?>
See it yourself
Below are some examples of what we were talking about in this tutorial:- PopCritics.com is using custom taxonomies to output different details about the movies. See the Genre(s), Actor(s), etc…
- TypeChart.com is another great example of WordPress site that is making good use of taxonomies for finding font styling. You can see that in the sidebar.
- Soh Tanaka’s portfolio is also using taxonomies to output details on projects. Observe the Client, Date, URL, Tasks, etc…
Using Custom Taxonomies to create a T-shirt store

Now that you have learned how to use custom taxonomies, we will use them for creating a T-shirt store. This won’t be a fully functional one, we will just build up the part that is using custom taxonomies.
1. Preparations
First of all we need a theme. We will use the new WordPress 3.0 default theme, called Twenty Ten. In order to get this theme and have it properly working, you need to download WordPredd 3.0 RC2. To get this version, scroll down to the bottom of the page, and the last one should be WP 3.0 RC2. Do not be worried working with WP 3.0, it has the same template tags.Next, you will need a local server, so the best way to create it, is using WAMP, or just build up your own environment following this previous tutorial on 1stWebDesigner.
Now that you have your local server up and running, just install WordPress.
2. Editing the Twenty Ten theme
Now we need to create our custom taxonomies. First of all, think about what custom taxonomies you will need. For a T-shirt store we need to provide:- size details
- price
- brand
// Custom taxonomy for Size
register_taxonomy('Size', 'post',  array(
'hierarchical' => false, 'label' => 'Size',
'query_var' =>  true, 'rewrite' => true));

// Custom taxonomy for Price
register_taxonomy('Price', 'post',  array(
'hierarchical' => false, 'label' => 'Price',
'query_var'  => true, 'rewrite' => true));

// Custom taxonomy for Brand
register_taxonomy('Brand', 'post',  array(
'hierarchical' => false, 'label' => 'Brand',
'query_var'  => true, 'rewrite' => true));
After creating the custom taxonomies, we need to modify the loop too. So this will be a little difficult, because you need to take care to not break any of the theme’s code. Don’t worry, I’ll guide you through this.Modifying the loop. Open up the index.php file from the 2010 theme. After you have opened it, you will see a tag that is calling the loop.php file:
<?php
 /* Run the loop to output the posts.
 * If you want to  overload this in a child theme then include a file
 * called  loop-index.php and that will be used instead.
 */
 get_template_part( 'loop', 'index' );
 ?>
We will need to completely delete this, and create a our own loop. So, instead loop tag, copy and paste this following code:
<?php if (have_posts()) : while (have_posts()) : the_post();  ?>
<div id="post-<?<span class=">
<pre><?php the_ID(); ?>" ></pre>
</div>
 <h1><a href="<?php the_permalink(); ?>"></a>
<div>
 <!--Insert custom field and custom taxonomies code here-->
<pre><?php wp_link_pages( array( 'before' =>  '</pre>
<div>' . __( 'Pages:', 'twentyten' ), 'after' =>  '</div>
' ) ); ?>
 </div><!-- .entry-content  -->
</div>
<pre><?php endwhile; else: ?></pre>
<div id="post-<?<span class=">
<pre><?php the_ID(); ?>" ></pre>
</div>
 <h1  class="entry-title">Nothing here...</h1>
<div  class="entry-content">
Sorry, no T-shirts avaiable for  sale. Try coming back later.
 </div><!--  .entry-content -->
</div>
<?php endif; ?>
This is the loop that we will use. The ID and class are some theme specific styles. You have to notice that I have removed the meta data. Now, we will need to add the codes that will retrieve our custom taxonomies and we will need to make use of custom fields too, to retrieve t-shirt thumbnail. Add them exactly where you see the HTML comment in the above code. Now, here’s the code that we need:
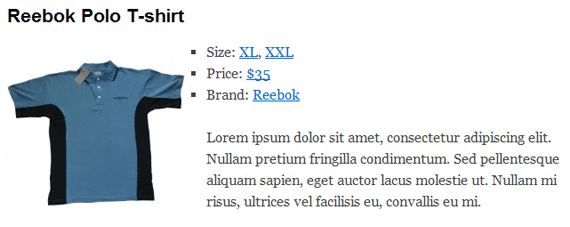
<img src="ID, 'post-icon', true);  ?>" alt="Icon for Post #"  />
<ul>
<li><?php echo get_the_term_list($post->ID,  'Size', 'Size: ', ', ', ''); ?></li>
<li><?php echo  get_the_term_list($post->ID, 'Price', 'Price: ', ', ', '');  ?></li>
<li><?php echo get_the_term_list($post->ID,  'Brand', 'Brand: ', ', ', ''); ?></li>
</ul>

<?php the_content(); ?>
Notice that the custom field name is “thumb”. For using this custom field you need to create a new one with the name thumb, and the value of it is the link to your thumb. Now that we have everything set, what about trying to publish a sample post. Take a look at mine:
Conclusion
So, you have learned how to use custom taxonomies, and you have created a little T-shirt store. Well, not a fully functional one, but it’s a good start :)If you have any questions regarding this tutorial please do not hesitate to ask via comments. I’ll try to solve all your problems. Thank you!

0 comentarii:
Post a Comment